Enjoy the little things in life, for one day you may look back and realize they were the BIG things...

Thursday, 17 April 2014

Easter Joy

I LOVE Easter! I think this is my favourite Holiday - so full of HOPE  and LIFE  and COLOURS ❤️

This post is just a little round-up of some of the little things that have made me happy the last few weeks:


Pretty nostalgia:  Easter eggs and pastel coloured candy...


I made some crochet eggs in soft, muted pastels for a friend's birthday. Decoupage on the cartons transformed it from a dull and ordinary egg-carton to a vintage looking gift-box :-)


Crochet eggs in brighter colours for myself ❤️


Looking bright and happy on the kitchen shelf


I experimented with some eatible eggs, too, and found that using food colouring (for baking) in the water, either during or after boiling, gives the most amazing colour to the eggs. 


I made som breakfast rolls shaped  as little birdsnests, and placed a lightly boiled egg in each nest before baking them in the oven for about 10 minutes. 
The kids loved them ❤️


I also tried to make some Easter Bunnies, but I think they came out looking more like evil mice (!) then cute, little bunnies, but you get the idea.....


This little crochet bunny was a gift for my 3-year old niece. The pattern is my version of this one from the wonderful Green Dragonfly blog. 


...and one from the back with the cute, littele pom-pom tale :-)


Some more french macarons were made. I'm still a  little high on my success on making these, so right now this is my biggest cake-addiction....

Looking good on the tray, all dressed up and sprinkled for Easter....


Just a little taste before the cream filling was added...


...and even more pretty all finished with raspberry cream filling. 

This box was a little Easter gift for my wonderful sister-in-law  ❤️


These amazing eggs from Royal Copenhagen are such a joy to take out every Easter  ❤️ I have collected quite a few of these, and they are all small works of art. So beautifully painted - so precious ❤️


So beautiful....but I should have polished the silver top before I photographed it.....:-/


A small attempt on catching up on my big Moodblanket project...I should have known that this "one square a day" plan would be almost impossible to keep up with.....There's just too many exciting projects to work on....But I have not given up on this, and I will finish it!


One of my biggest "everyday pleasures": quiet and calm mornings, while the rest of the family are still asleep.
Just me, my coffee, some candlelight and my crochet. The BEST way to start a day ❤️


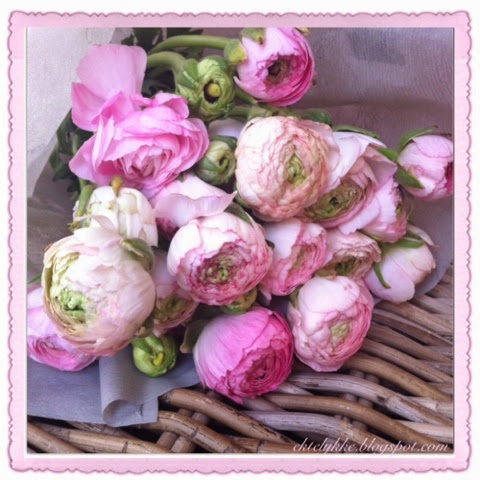
I'll end this little "parade of happiness" with some more flower photos. My garden is waking up again, and preparing for summer. I can't wait ❤️


Ranunculus - just can't get enough of them at the moment.  So beautiful  ❤️❤️❤️


Until next time....


                                   ❤️ Live - Love - Laugh ❤️


Monday, 7 April 2014

Sweet pastel overdose.......


The week has been all about baking. I love to bake, so whenever there's a birthday in the family, the creative part of my brain starts planning the cakes for the party. The  practical and sensible part of my brain, however,  tries to convince me that I really do not have the time to all I have in mind....Ususally the creative side wins, and I ALWAYS end up sweating in the kitchen with all my unfinished cakes until waaaay past bedtime the day before the party....

I just never learn! 

Macaron triumph!

This week we had another big day to prepare for in the family, and this time I decided to add something completely new to my cake repertoire...French Macarons...

I absolutely LOVE these beautiful little cakes, and after careful studying of several recipies I made my first attempt on some plain vanilla macarons, inspired by the incredibly talented Manuela Kjeilen. Everything this woman bakes and makes is soooo beautiful and so inspirational, so if you are interested in baking you should read her blog. 

Anyway, my vanilla macarons came out PERFECT! I really did not expect that, and was so excited about it that I forgot to take a photo of them.....

So, full of confidence after my macaron triumph, I continued with a lime version.....

They looked really nice on the tray.....


But these were not a success! The cakes came out of the oven looking like sticky, green bubble gum.....
I have no idea what I did wrong the seond time around, but on my third attempt -  this time with a pink strawberry version - I got back on my feet again. Most of the pink cakes were almost perfect, some had some smaller cracks in them, and a few did not really look like macarons at all, so I changed the name to "fairy princess cakes" for Little Missy and her friends....


I continued forward with a lemon and a blueberry version, and all in all I'm quite happy with the result.
 The vanilla ones were smooth and flawless (so proud!!) , the others OK, but for a first timer I think I did quite well  :-)

The taste, however, was pure HEAVEN! I made two types of cream filling:  One plain with white chocolate, and one with white chocolate and raspberries. So yummy!!


I figured I would have plenty of cakes left to enjoy after the party, but this big tray of goodies was empty in a matter of minutes.....!! 


Happy Colours ❤️❤️❤️


Cupcake cuteness overload..


This weekend I also had quite a few cupcakes to make for Little Missy's choir, and spent Friday afternoon making 36 caramel cupcakes for them to bring with them to a big choir festival.

Mmm, fresh from the oven and the kitchens smells divine from caramel and vanilla..❤️


Since this is an all girls choir, I could go all the way with pretty pastel colours and spinkles.....❤️❤️❤️

The recipe is based on a basic vanilla cupcake, but I added some powder for caramel pudding to the batter to get a lovely caramel flavour. Remember to reduce the amount of sugar accordingly if you do this, if not the cupcakes will be way to sweet....

The frosting is yummy Vanilla Bean frosting. This frosting is so easy to work with and  the taste is loved by everyone (in my experience, anyway...)

Tip: Put the cupcakes under the grill in the oven for just a few minutes) after they are decorated. 2-3 minutes are enough. Be careful not to leave them in too long - just enough to heat up the surface a little bit. This way the surface hardens a bit, which make it much easier both to eat and to tranport the cupcakes (i.e. to a choir festival.....) without getting the frosting all smudged....


Bad photo! This really does not give justice to the pretty colours....
I added som raspberry flavour to the pink frosting - very poplular among the little singers....:-)


A kiss from a rose...

I had some of the pink Vanilla Bean Frosting left after decorating the cupcakes, so I made a few trays with the sweetest "rose-kisses", spinkled with sugar crystals and pearls. Bake these lovelies in the oven on 100 C (220 F) for about 1 hour. Turn the oven off and leave the merengue in the oven for at least  another hour to cool off. These are lovely to eat as they are, or use as decorations on cakes or with ice cream....
Pink yumminess all the way....❤️❤️❤️


I love this beautiful Tilda cake tin.  A perfect hostess gift  ❤️


Just pretty....❤️


Link to some wonderful recipes and tutorials from my favourite baking blog

http://www.passionforbaking.com/blog/2013/03/13/vanilla-macarons-made-with-love/

..and one for chocolate and carammacarons. I'm going to make these next time!!

http://en.passionforbaking.com/blog/2013/09/29/chocolate-macarons/


                                        ❤️  Live - Love - Laugh ❤️


Monday, 31 March 2014

I'm walking on sunshine!

Wow - what a weekend this has been! The weather these days is amazing - so warm and beautiful ❤️

After months and months with dark rainy days, this is like a massive vitamine boost for both  body and soul. Sooo needed and so appreciated!

It's like we all crowl out of hibernation, and suddenly start to talk and smile to eachother again....The neighbourhood is buzzing with life, and the children are all running around on happy, light feet in new sneakers! Not a rubberboot or raincoat in sight. Pure bliss ❤️

Everything gets back to life; the butterflies dance, the bees are buzzing, the children run and laugh in the garden, the barbeques lit up again after a long winter tucked away in the garage, so the whole neighbourhood smells like (burned) sausages and hamburgers.....

This is why we endure those long winters in this country: the wonderful spring and summers all make up for it. And right now it impossible to imagine anything else but sunshine... It's a survival mechanism, I guess....:-)

Statisticly the Western-Norway summers are wet and cold (June is ususally pretty much like December when it comes to temperature and humidity......), but right now I think we are heading for the BEST summer ever - ha, ha! A girl can dream, right?

This weekend has been all about spring and Easter preparations. Pretty pastels in abundance, both in my garden and on my hook. Wonderful, healthy colour therapy!❤️❤️❤️❤️

I made some pretty Easter eggs last week.  These colours make me so happy !!


One of my best friends will get one of these pimped "vintage" egg cartons for her birthday.

I love the nostalic and old-fashioned look it gets with some pretty pictures and lace. Decoupage is so much fun :-)


I usually have a pretty strict coloursheme in my garden; white, light pink, pale violets, light blue....all muted pastels to give a soothing and calm feeling.

But in the spring, when everything comes back to life, I need strong colours! The bright narcissus and crocus are the only yellow I allow in my garden, but when they bloom they bring so much joy!!

It's like a fresh breath of air and happiness to see all these pretties make their way out of the dark soil and greet the sun with such boldness of colours and strenght!


His Majesty on post...From this warm spot in the sun he controls the whole garden....:-)

These cushions were the first crochet items I made, when I taught myself to crochet a little over a year ago.
They usually sit on my daughters bed, but this weekend she took them out in the garden. Pretty colours in the sun ❤️


I got some really Happy Mail last week when my latest yarn-order arrived. Amazingly soft and pretty alpaca silk in the most wonderful colours. I'm saving this pretty yarn for a special project - I just have to figure out what it will be....


This is what I want in my Easter Egg :-)

This colour....oh my ❤️

Little Missy and her sweet little friends made Easter decorations in the garden. Ballons, candy, wallpaper-glue and yarn, and voila: you get colourful, candy-filled Eastereggs:-)

(I'm planning to make some pretty fairylights lanterns using the same method...Will get back to you on that one if the idea works out OK....:-))

Until next time I wish you all a wonderful, sunny time, and leave you with this little, willstrong fellow:

Talk about making your way into the world - some asphalt concrete is not going to stop this little Happy Flower from blooming :-) Maybe a lesson to many of us not to give up too soon - when you gotta bloom, you gotta bloom! Just reach for the sun ❤️


                                     ❤️ Live - Laugh - Love ❤️


Friday, 7 March 2014

Olympic hat madness!

My previous post was in Norwegian, and included a pattern for my version of the incredibly popular Norwegian Olympic Hat. Since I posted this, I've had a few requests via e-mail and Instagram for an English version of this pattern, so now I've tried, to the best of my ability, to translate this into English. You'll find the pattern at the end of this post.

And for those of you who have no idea which hat I'm talking about, and what the fuzz is all about, here's a little background info:

The last couple of weeks, Norway has been hit by a massive "hat-madness"  involving some cute, crocheted, light blue "Smurf-hats" worn by the Norwegian athlets during the Winter Olympics.

The Norwegian athlets` Olympic uniforms were from the Japanese sportsbrand Phenix, and personally I think they looked great! Fresh, simple, sporty and very Scandinavian looking. Very fitting for our great athets. But the "cherry on the top" was without a doubt the light blue crochet hat! This hat was sold by one retailer only in Oslo, Norway, and the 10 000 hats they had in stock were sold out so fast that the Olympics  had bearly started when the hat-frenzy began.

(The original Phenix  hats are now being sold online for more than 5 times the original price.... ! Crazy!)

As soon as the first Norwegian medal was a fact, and the athlets started to appear on the podium and on TV all wearing these hats, my kids started asking for hats of their own. So, after a few hours of nagging, I put away all my other WIPs and started making my first hat.


It worked out pretty well, and my son walked proudly to school the next day wearing his new hat. It was an immediate hit at school, so he came home with orders from his friends.


Here's a little comparison with the original:


(Photos from langrenn.no and nettavisen.no) 


..I made a few more hats with yarn from my stash, but then I had to get some more, and this turned out to be a very difficult task....

Crocheters all over Norway had quickly seized the moment, and had begun making there own hats, so already during the first week of the Olympics, yarnstores and - producers all over Norway were sold out of light blue yarn! I searched online and in every local yarnstore, but they were all sold out of all types of ligh blue wool...
So, forced  to leave the hatmaking for a few days, I'm now waaay behind on all the "orders". I have made 10, but I still have quite a few left. Let's just hope this "hype" will last until I've finished the last one...


By now there are lots of patterns for this popular hat in "Blogland" right now, since it is a fearly simple pattern to figure out from looking at the photos of the orignal.
I have, however, been faithful to my own version, which I find works well and has a nice fit.


When I've finished with all these Olmpic hats, I think I will try to make this in other types of yarn and colours, maybe with a pompom on top? (Or maybe I'm so sick and tired of making hats that I will avoid it for a long time....!)

Anyway, enough chit chat....


Here is the pattern to my version of the Olympic hat. I'm not used to writing patterns, and this is my first ever pattern in English, so if you try it and find something confusing og wrong, please let me know so I can correct it! I'd appreciate any feedback on this!
I've included two versions; one with UK terminology and one with  US terminlogy:


Pattern for the (un-official) Norwegian Olympic Hat
(UK version)

 Yarn suggestion: Dale Babywool - 100% Merino (use double thread)

Approx. 2-3 skeins of light blue, 1 skein of red

Needle: 4- 5mm (depending on how tight you crochet)

The original hat from Phenix is probably made with the double crochet (dc) stich, but my preference is the half treble stich (htr),  which in my opinion gives a «firmer» and neater result. This pattern goes with both types of stiches, so which one you choose is up to you J

Size: The pattern fits the size of most children (from age 6 ) and women. If you want to make the hat smaller or bigger, it is easy to adjust the width by reducing or adding the number of stich increases.

Row 1: Make a «Magic Ring» and crochet  8 htr in the ring, or chain 8 and make a ring with a slip stich (sl st) in the first chain. Crochet 8 htr in the ring.

NB! All further rows start with chain 2 (functions as 1 htr) End all rows with a sl st in the first htr (2.chain from the previous row)


Repeat from * to * till the end of the row.

Row 2: * 2 htr in every htr *. You will now have 16 htr

Row 3:  * 2  htr in every htr.  * You will now have 32 htr

Row 4:  *1  htr, 2 htr in every htr * You will now have 44 htr

Row 5: * 2 htr, 2 htr in the next  htr * You will now have 57 htr

Row 6: * 3 htr, 2 htr in the next htr . You will now have 72htr.

Row 7-8: *1 htr in every htr*

If you want a bigger hat, you can do another row with increases now, if not you just continue with 1 htr in every htr until you reach the length you prefer.

(Row 9: *4 htr, 2 htr in the next htr* You will now have 82 htr)

Try the hat on as you go, to make sure the fit is OK. If it is too wide or too small, you can easily increase or decrease to get a perfect fit. It is supposed to be snug around you head, but with a baggy top.

When you reach you preferred length, fasten off with a sl st.

Red edging: I used 3 threads of yarn on the edging to make it a little firmer than the rest of the hat.

Row 1: *1 htr in every htr*

Row 2: * Dc in every htr*

Fasten off with a sl st and weave in all the ends.

If the hat is a little “bulky”, cover it with a damp cloth and use a steam iron to steam in into shape. And voilà; you hat is ready to be loved and worn J


Pattern for the (un-official) Norwegian Olympic Hat
(US version) 
Yarn suggestion: Dale Babywool (use double thread)
Approx. 2-3 skeins of light blue, 1 skein of red
Needle: 4- 5mm (depending on how tight you crochet)
The original hat from Phenix is probably made with the single crochet (sc) stich, but my preference is the half double crochet stich (hdc),  which in my opinion gives a «firmer» and neater result. This pattern goes with both types of stiches, so which one you choose is up to you J
Size: The pattern fits the size of most children (from age 6 ) and women. If you want to make the hat smaller or bigger, it is easy to adjust the width by reducing or adding the number if stich increases.
Row 1: Make a «Magic Ring» and crochet 8 hdc in the ring, or chain 8 and make a ring with a slip stich (sl st) in the first chain. Crochet 8 hdc in the ring.
NB! All further rows start with chain 2 (functions as 1 hdc) End all rows with a sl st in the first hdc (2.chain from the previous row)
Repeat from * to * till the end of the row.
Row 2: * 2 hdc in every htr *. You will now have 16 hdc
Row 3:  * 2  hdc in every htr.  * You will now have 32 hdc
Row 4:  *1  hdc, 2 hdc in every htr * You will now have 44 hdc
Row 5: * 2 hdc, 2 hdc in the next hdc * You will now have 57 hdc
Row 6: * 3 hdc, 2 hdc in the next hdc . You will now have 72 hdc.
Row 7-8: *1 hdc in every hdc*
If you want a bigger hat, you can do another row with increases now, if not you just continue with 1 hdc in every hdc until you reach the length you prefer.
(Row 9: *4 hdc, 2 hdc in the next hdc* You will now have 82 hdc)
Try the hat on as you go, to make sure the fit is OK. If it is too wide or too small, you can easily increase or decrease to get a perfect fit. It is supposed to be snug around you head, but with a baggy top.
When you reach you preferred length, fasten off with a sl st.
Red edging: I used 3 threads of yarn on the edging to make it a little firmer than the rest of the hat.
Row 1: *1 hdc in every hdc*
Row 2: * sc in every hdc*
Fasten off with a sl st and weave in all the ends.
If the hat is a little “bulky”, cover it with a damp cloth and use a steam iron to steam in into shape. And voilà; you hat is ready to be loved and worn J


                                     ❤️  Live - Laugh - Love ❤️


Related Posts Plugin for WordPress, Blogger...